Connection Wizard
The Connection Wizard walks you through the steps needed to set up a Crux VPN connection. You can use it to set up a new interface from scratch (the Add Interface Wizard), or to add a new endpoint to an existing interface (the Add Endpoint Wizard).
The wizard consists of five steps:
- Type: You select the type of connection.
- Identity: You select the identity of the two peers (and their hosts) to connect.
- Transport: You specify the public IP address and port of one or both hosts.
- Tunnel: You select the internal IP addresses used by each peer; as well as specify any other network addresses that one peer can route to the other.
- Extras: You select extra options like forwarding and DNS settings.
- Review: You review the configuration settings that will be generated.
Within each step, fields shown on the left side of the page apply to the host or interface from which you are starting the wizard (the “local” side of the connection), and fields shown on the right side of the page apply to the other side of the connection (the “remote” side of the connection). The specific fields and field names displayed will depend on the type of connection you choose in the first step.
Type
The first step of the wizard asks you to choose the type of connection to set up. Select the radio button corresponding to the type of connection you want:
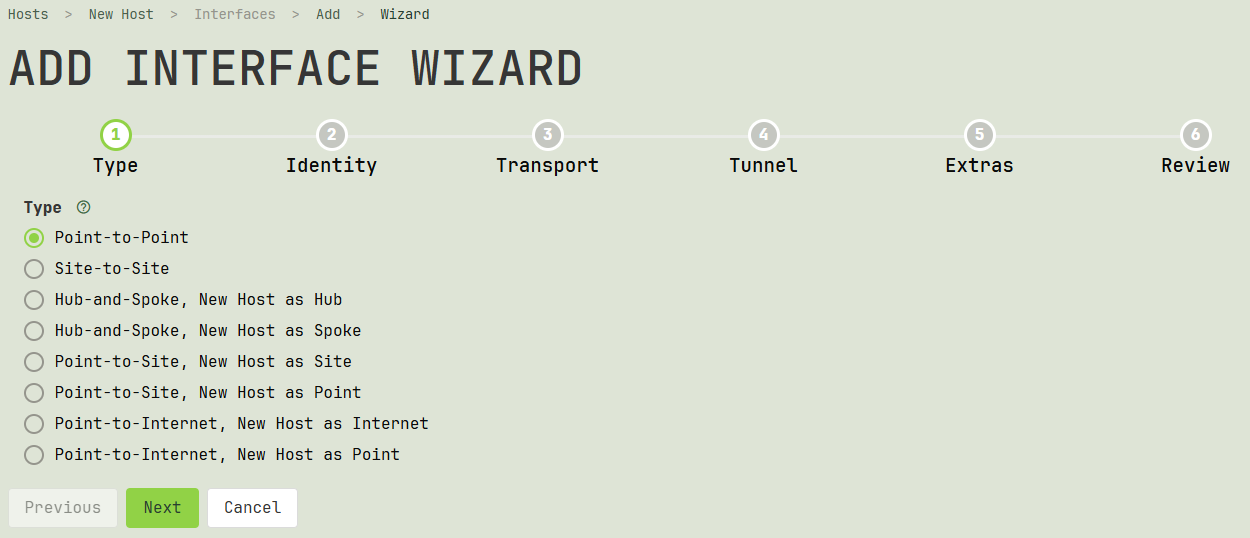
Point-to-Point
A connection between two individual hosts in a simple point-to-point topology.
Site-to-Site
A connection between two networks in a basic site-to-site topology. Each network has a host running Crux VPN on it that acts as a gateway to the other network; the wizard helps you configure the interface on each host for this purpose.
Hub-and-Spoke, as Hub
A connection between a central hub and an individual spoke, in the classic hub-and-spoke topology, allowing each spoke to access other spokes. The hub and each spoke runs Crux VPN; the wizard helps you set up the connection between the hub and one spoke, starting with the interface on the hub.
Hub-and-Spoke, as Spoke
A connection between a central hub and an individual spoke, in the classic hub-and-spoke topology, allowing each spoke to access other spokes. The hub and each spoke runs Crux VPN; the wizard helps you set up the connection between the hub and one spoke, starting with the interface on the spoke.
Point-to-Site, as Site
A connection between a network and a single host not part of the network, using the point-to-site topology. The point runs Crux VPN, and the network has a host in it that also runs Crux VPN and serves as a gateway to the network for the point; the wizard helps you set up the connection between the point and the site gateway, starting with the interface on the site gateway.
Point-to-Site, as Point
A connection between a network and a single host not part of the network, using the point-to-site topology. The point runs Crux VPN, and the network has a host in it that also runs Crux VPN and serves as a gateway to the network for the point; the wizard helps you set up the connection between the point and the site gateway, starting with the interface on the point.
Point-to-Internet, as Internet
A connection between two hosts where one host provides Internet access to the other (essentially following the point-to-site topology, where the “site” is the Internet). Both hosts run Crux VPN; the wizard helps you set up the connection between them, starting with the interface on the Internet gateway.
Point-to-Internet, as Point
A connection between two hosts where one host provides Internet access to the other (essentially following the point-to-site topology, where the “site” is the Internet). Both hosts run Crux VPN; the wizard helps you set up the connection between them, starting with the interface on the point.
Once you have selected an option, click the Next button.
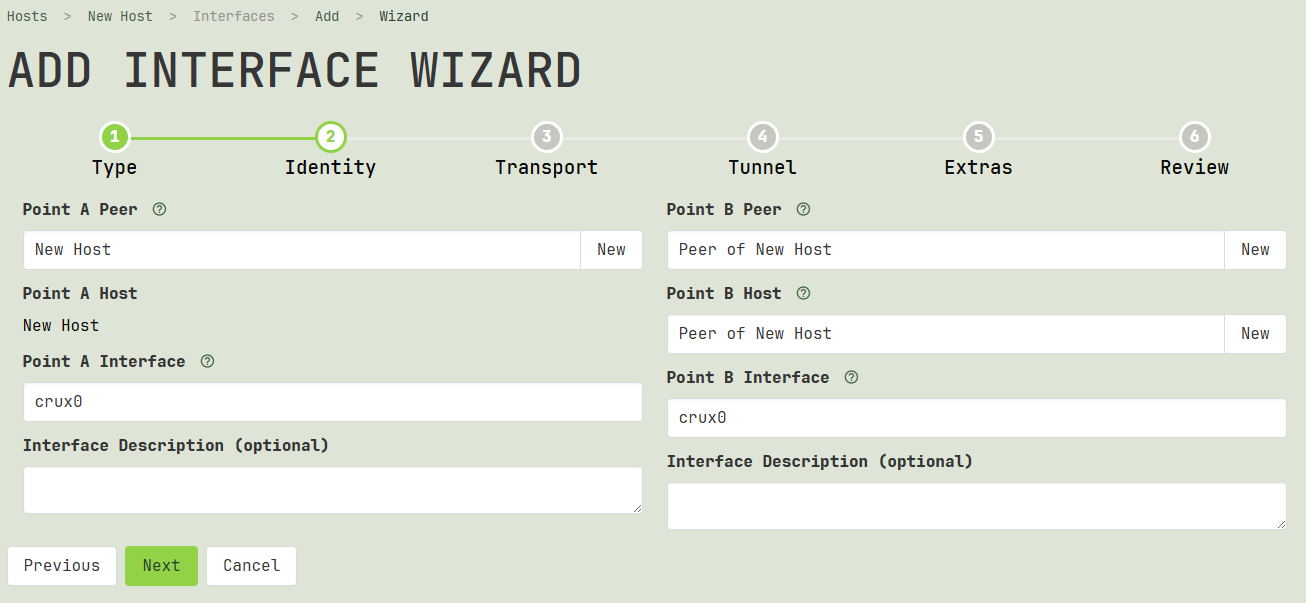
Identity
The second step of the wizard asks you to choose which two peer identities to connect: one on the left side of the page (the “local” side), to the other on the right (the “remote” side).
Local Peer
When adding an interface via the Add Interface Wizard, the wizard will ask you to select a peer on the left side of the page, to use as the peer identity for the WireGuard interface that you are adding. The public key of the peer you select will be used by WireGuard interfaces on other hosts to identity this interface.
You can either enter the name of a peer already registered with Crux VPN in the Peer field, or you can add a new peer by clicking the New button next to the Peer field. If you type part of a name in the Peer field, it will filter the displayed list of peers from which to choose.
If you click the New button next to the Peer field, an Add Peer dialog will appear, allowing you to register a new peer identity with Crux VPN; you can then select this peer to use.
When adding an endpoint via the Add Endpoint Wizard, the wizard will not ask you to select a peer on the left side of the page — the peer identity for the local interface has already been set.
Local Host
The wizard will not ask you to select the host on the left side of the page. The local host has already been set (to the host from which you started the wizard).
Local Interface
When adding an interface via the Add Interface Wizard, after you select a local peer, you may set the name of the interface to add on the left side of the page. The wizard will auto-generate an interface name for you, defaulting to crux0.
You can edit the auto-generated interface name in the Interface field if you prefer to name the interface differently. This name must be less than 16 characters, and must consist of only ASCII letters, numbers, dot (“.”), dash (“-”), and lodash (“_”) characters. It also must be unique among any other network interface names used by the host.
Note
For macOS hosts, the interface name must either be utun, or utun and a number, like utun0, utun1, etc. For OpenBSD hosts, the interface name must either be tun, or tun and a number, like tun0, tun1, etc.
This name can be changed later; but because it will be used by the host to identify the interface, changing it may break other things on the host that have been configured to interact with the interface.
You can also add a description for the interface, like staging network for APAC, in the Interface Description field. This description will be displayed alongside the interface name in various places in the UI. There are no length or character restrictions, and you can change it without consequence later.
When adding an endpoint via the Add Endpoint Wizard, you cannot change the interface name on the left side of the page — the name of the local interface has already been set.
Remote Peer
On the right side of the page, the wizard will ask you to select a peer to use as the peer identity for the other side of the connection.
You can either enter the name of a peer already registered with Crux VPN in the Peer field, or you can add a new peer by clicking the New button next to the Peer field. If you type part of a name in the Peer field, it will filter the displayed list of peers from which to choose. Only peers not already used by another endpoint of the local interface will be listed.
If you click the New button next to the Peer field, an Add Peer dialog will appear, allowing you to register a new peer identity with Crux VPN; you can then select this peer to use.
Remote Host
On the right side of the page, the wizard will ask you to select the host for the other side of the connection. If the peer you selected above already is registered with a host and interface on Crux VPN, the wizard will automatically select that host and interface for you.
If the wizard did not automatically select a host, or if you want to use a different host, you can either enter the name of a host already registered with Crux VPN in the Host field, or you can add a new host by clicking the New button next to the Host field. If you type part of a name in the Host field, it will filter the displayed list of hosts from which to choose.
If you click the New button next to the Host field, an Add Host dialog will appear, allowing you to register a new host with Crux VPN; you can then select this host to use.
Remote Interface
If the host you selected on the right side of the page does not already have an interface registered for the peer you selected, you may set the name of the interface to register for it on the right side of the page. The wizard will auto-generate an interface name for you, defaulting to crux0.
You can edit the auto-generated interface name in the Interface field if you prefer to name the interface differently. This name must be less than 16 characters, and must consist of only ASCII letters, numbers, dot (“.”), dash (“-”), and lodash (“_”) characters. It also must be unique among any other network interface names used by the host.
Note
For macOS hosts, the interface name must either be utun, or utun and a number, like utun0, utun1, etc. For OpenBSD hosts, the interface name must either be tun, or tun and a number, like tun0, tun1, etc.
This name can be changed later; but because it will be used by the host to identify the interface, changing it may break other things on the host that have been configured to interact with the interface.
You can also add a description for the interface, like staging network for APAC, in the Interface Description field. This description will be displayed alongside the interface name in various places in the UI. There are no length or character restrictions, and you can change it without consequence later.
Once you’ve selected the local and remote peers, hosts, and interfaces, click the Next button.
Transport
The third step of the wizard asks you to specify the public IP address of one or both hosts (as well as its public listen port). You must specify at least one side’s public IP address to enable Crux VPN to set up a connection between the two hosts.
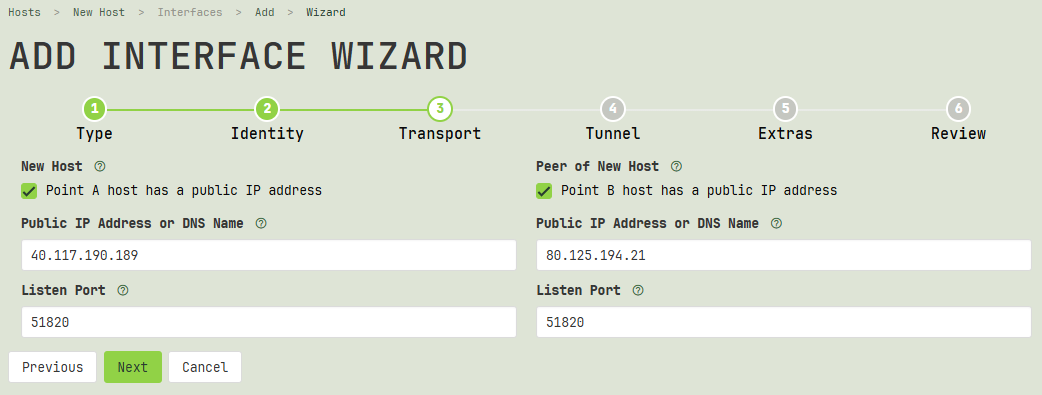
Local Host Has Public IP
If the local side of the connection (the host or interface for which you started the wizard) has a static public IP address, check the Host has a public IP address checkbox on the left side of the page, and enter the host’s IP address (or DNS name) into the Public IP Address or DNS Name field below the checkbox; and enter the listen port for the host’s interface in the Listen Port field below its address.
Note
If you check the checkbox on the left (local) side of the page, make sure you adjust any host- or network-based firewalls between the two hosts to allow the remote host to initiate new connections to the local host at the IP address and UDP port you’ve entered.
Remote Host Has Public IP
If the remote side of the connection has a static public IP address, check the Host has a public IP address checkbox on the right side of the page, and enter the host’s IP address (or DNS name) into the Public IP Address or DNS Name field below the checkbox; and enter the listen port for the host’s interface in the Listen Port field below its address.
Note
If you check the checkbox on the right (remote) side of the page, make sure you adjust any host- or network-based firewalls between the two hosts to allow the local host to initiate new connections to the remote host at the IP address and UDP port you’ve entered.
IP Address
The IP address you enter into the Public IP Address or DNS Name field should be the host’s address from the perspective of the other side of the connection. For example, if the hosts on both sides of the connection are on the same LAN, you would enter the host’s LAN address. If the hosts are separated by the Internet, you would enter the Internet address of the host. If the host sits behind an Internet gateway, and you’re able to forward ports from the Internet gateway to the host, enter the Internet address of the gateway, and configure the gateway to forward the listen port to the host.
Listen Port
The port you enter into the Listen Port field should be the UDP port listening for new connections from the perspective of the other side of the connection. When setting up a new interface, the wizard will suggest a standard port number to use (usually “51820”).
The listen port cannot be in use by any other network service running on the host, including other Crux VPN interfaces. If, when setting up a new interface, you select a port already in use by another interface, the wizard will display a must be unique on host error message.
Caution
When setting up an endpoint for an existing interface that does not already have a listen port configured, the wizard will display an “existing interface does not have a port set” warning message. You can proceed despite this warning message, but the new connection will not be available until the existing interface has been restarted to listen on the new port, which may interrupt existing connections currently using the interface.
Note
If you’ve set up port-forwarding on a gateway between the two hosts and you’re forwarding from a source port that is different than the destination port, enter the source port in the Listen Port field; and if you’re adding a new interface, after you complete the wizard, edit the new interface to change its actual listen port to the destination port. (If the source and destination ports are the same, you don’t need to make any edits.)
When you’re adding a new endpoint to an existing interface in this scenario (port forwarding with different source and destination ports), the wizard will display a does not match existing interface port warning message. As long as you’ve entered the correct source port, you can proceed with the wizard despite this warning.
Once you’ve entered the IP address and port for at least one side of the connection, click the Next button.
Tunnel
The fourth step of the wizard asks you to specify the internal WireGuard addresses of each side of the connection, as well as the network addresses that each side can route to the other through the encrypted tunnel.
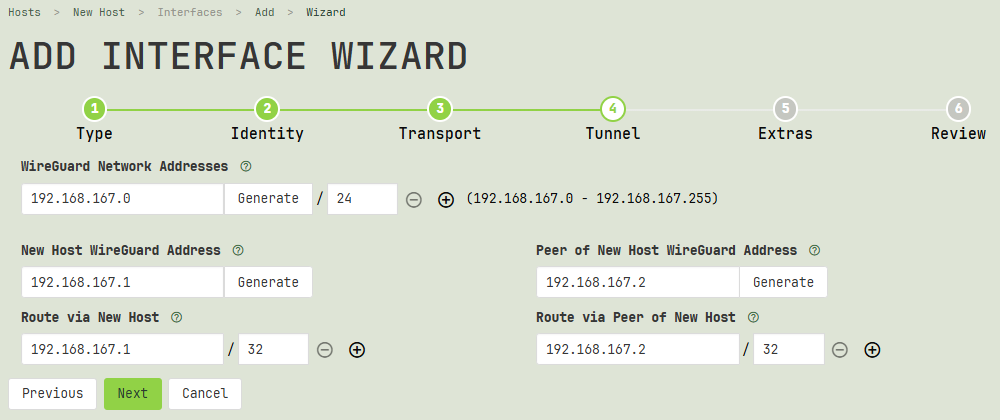
WireGuard Network Addresses
When setting up two brand new interfaces via the Add Interface Wizard, the wizard will ask you to choose the network address space you want to use for the internal IP addresses of the interfaces (you’ll then choose individual addresses below from within this larger space). Click the Generate button to use the wizard’s Generate Network Address dialog to generate an appropriate network address at random; or if you have already decided what address space to use, enter it directly.
Click the icon next to a network address to add another address; or (if you have multiple addresses) click the icon to remove one of the addresses.
Tip
Most of the time, you will want to select either one IPv4 network address with a prefix length of /24 (eg 10.20.30.0/24), or one IPv6 network address with a prefix length of /64 (eg fd12:3456:7890:abcd::/64). If you want to use both IPv4 and IPv6 with WireGuard, select one /24 IPv4 network address and a second /64 IPv6 network address. (You could potentially select multiple IPv4 addresses or multiple IPv6 addresses — but usually there is no reason to do so.)
To avoid conflicts with other IPv6 networks, the best practice for choosing IPv6 network address space is to generate at least the first 40 bits at random from the fd00::/8 block (known as the “locally assigned” block of Unique Local IPv6 Unicast Addresses) to produce a unique /48 block for your entire site (eg fd12:3456:7890::/48). You can then assign up to 65,536 /64-size subnets within your site as you please (eg fd12:3456:7890:1::/64, fd12:3456:7890:2::/64, fd12:3456:7890:3::/64, etc).
Alternatively, for networks that don’t fit neatly into the site concept, choosing a random /64-size network from within the fd00::/8 block works nicely to eliminate the likelihood of a conflict with any other networks.
For IPv4, to minimize conflicts with other networks, you may want to select an IPv4 network address with a prefix length smaller than /24. For example, when setting up a network that will only ever consist of two peers, a /31-size network will do just fine (eg 10.20.30.40/31 — space for one address of 10.20.30.40 for one peer, and a second address of 10.20.30.41 for the other peer). You might try Krischan Jodies' ipcalc tool to explore different options for IPv4 address space.
Note
If the wizard displays an address must fit prefix length error message, it means the prefix length of a network address is too short (ie the netmask does not cover all the significant bits of the address). You must change either the network address or its prefix length to fit all of the address’s 1-bits.
For example, the wizard will display the address must fit prefix length error message for a network address of 10.20.30.0/16, since the address has at least 23 significant bits, but only 16 are masked. Either change the network prefix length to cover the significant portion of the address (eg 10.20.30.0/24), or reduce the significant portion of the address (eg 10.20.0.0/16).
If one interface already exists (on either the local or the remote side), the wizard will present you the network address space which the existing interface appears to be using. You may add, remove, or edit the displayed networks; but your changes will apply only to the addresses of the new interface, not the existing one.
When using the Add Endpoint Wizard with two WireGuard interfaces which already exist, the wizard will show you the network address space the existing interfaces appear to be using — but you cannot make any changes to the interfaces' network space or addresses.
Local WireGuard Address
On the left side of the page, the wizard will display the internal IP addresses of the local interface. These are the IP addresses the remote host (or connections forwarded by the remote host) should use in order to connect to any network services that the local host itself exposes through the tunnel.
If the local WireGuard interface does not yet exist, the wizard will generate one unique IP address for the interface from the address space of each network address you selected with the WireGuard Network Addresses fields above. Click the Generate button next to an address to generate a new random IP address from within the corresponding network’s address space; or enter a different IP address of your choosing.
Caution
If you enter an IP address that has already been assigned to a different interface, the wizard will display an already assigned warning message. You can proceed despite this warning message — but beware that this can cause conflicts if you try to use both interfaces at the same time. Unless you have a specific reason to do so (eg replacing old hardware), don’t re-use addresses.
If the local interface already exists, the wizard will display the existing IP addresses for the interface; you cannot change them in the wizard.
Route via Local Peer
On the left side of the page, the wizard will display the network addresses which the remote peer should route to the local peer. The wizard will generate one or more routable addresses based on the connection type and address space you’ve selected (which generally should include at least the addresses of the local peer itself).
You can edit each routable address; or click the icon next to a routable address to add another; or click the icon to remove one of the addresses.
Tip
If the local peer serves as a gateway to its local site from the network (ie Point-to-Site as a Site, or Site-to-Site connection type), add the site’s network address space to this list (if not already added).
For example, if the local peer’s host is on a LAN that uses the 192.168.1.0/24 address space, add 192.168.1.0/24 to the list of addresses to route via the local peer.
Remote WireGuard Address
On the right side of the page, the wizard will display the internal IP addresses of the remote interface. These are the IP addresses the local host (or connections forwarded by the local host) should use in order to connect to any network services that the remote host itself exposes through the tunnel.
If the remote interface does not yet exist, the wizard will generate one unique IP address for the interface from the address space of each network address you selected with the WireGuard Network Addresses fields above. Click the Generate button next to an address to generate a new random IP address from within the corresponding network’s address space; or enter a different IP address of your choosing.
Caution
If you enter an IP address that has already been assigned to a different interface, the wizard will display an already assigned warning message. You can proceed despite this warning message — but beware that this can cause conflicts if you try to use both interfaces at the same time. Unless you have a specific reason to do so (eg replacing old hardware), don’t re-use addresses.
If the remote interface already exists, the wizard will display the existing IP addresses for the interface; you cannot change them in the wizard.
Route via Remote Peer
On the right side of the page, the wizard will display the network addresses which the local peer should route to the remote peer. The wizard will generate one or more routable addresses based on the connection type and address space you’ve selected (which generally should include at least the addresses of the remote peer itself).
You can edit each routable address; or click the icon next to a routable address to add another; or click the icon to remove one of the addresses.
Tip
If the remote peer serves as a gateway to its remote site from the network (ie Point-to-Site as a Site, or Site-to-Site connection type), add the site’s network address space to this list (if not already added).
For example, if the remote peer’s host is on a LAN that uses the 192.168.1.0/24 address space, add 192.168.1.0/24 to the list of addresses to route via the local peer.
Once you’ve entered all the addresses and routes for both sides of the connection, click the Next button.
Extras
The fifth step of the wizard asks you if you want to make extra changes to the network configuration of the hosts when the tunnel is up. You may choose to make these network changes through WireGuard and Crux VPN; or you may rather make them permanently on the host outside of Crux VPN (eg via the host’s own network or firewall settings).
Depending on the connection type you selected (and whether or not you’re creating a new interface), the wizard may present you with some additional forwarding options for the local host (left side) or the remote host (right side):
Forwarding
Check the Forward inbound connections from WireGuard network checkbox if you want Crux VPN to configure the host to allow it to forward inbound connections from the WireGuard network to all other networks accessible to the host. Uncheck this checkbox if you intend to manually configure the host to allow packet forwarding.
Note
This option will take effect only on Linux. Also, note that this option may conflict with custom firewall rules you have set up on the host.
Masquerading
Check the Masquerade inbound connections from WireGuard network checkbox if you want Crux VPN to configure the host to allow it to masquerade inbound connections forwarded from the WireGuard network to all other networks. Uncheck this checkbox if you do not need masquerading for site access, or you intend to manually configure the host to allow packet masquerading.
Note
This option will take effect only on Linux. Also, note that this option may conflict with custom firewall rules you have set up on the host.
Tip
If the host is serving as an Internet gateway for a “Point-to-Internet” connection type, you need to set up packet masquerading.
However, if the host is serving as a site gateway for a “Point-to-Site” connection type, the best practice is to adjust the routing configuration at the site to enable the site to automatically route the WireGuard network via the host; and only if that is not feasible, configure the host’s firewall to masquerade packets forwarded from WireGuard.
MSS Clamping
Check the Clamp MSS outbound to WireGuard network checkbox if you want Crux VPN to configure the host to allow it to clamp the MSS (Maximum Segment Size) of outbound TCP connections forwarded to the WireGuard network from all other networks. Uncheck this checkbox if you intend to manually configure MSS clamping on the host.
Note
This option will take effect only on Linux. Also, note that this option may conflict with custom firewall rules you have set up on the host.
Tip
If the host will forward connections between two endpoints that are not part of the WireGuard network, such as with a “Site-to-Site” connection type, you need to set up MSS clamping (as the endpoints themselves will not be able to negotiate the appropriate MSS based on the MTU of their own direct connections).
Custom DNS
Select the Use custom DNS settings when tunnel is up checkbox or radio button if you want WireGuard to configure the host to use different DNS resolvers or DNS search domains when this connection is up (eg to use the private DNS servers and domain names for a private site when connected to it via WireGuard).
If you want the host to use different DNS resolvers, enter the IP address of the first resolver into the DNS Search field; click the icon next to the first DNS Search field to add more fields, and add the IP address of additional resolvers to each. If you don’t want to change the host’s DNS resolvers, simply leave the DNS Search field blank.
If you want the host to use different DNS search domains, enter the first domain name into the Search Domain field; click the icon next to the first Search Domain field to add more fields, and add an additional domain name to each. If don’t want to change the host’s DNS search domains, simply leave the Search Domain field blank.
Tip
If the host uses systemd-resolved as its internal DNS resolver, you may want to instead use PreUp scripts in its config file to run resolvectl commands to change its DNS settings.
Quad9 DNS
Select the Use Quad9 DNS servers when tunnel is up radio button if the host a) normally uses its ISP’s (Internet Service Provider’s) DNS resolvers (usually acquired via DHCP) and b) you want it to instead use the Quad9 DNS resolvers when the WireGuard connection is up (eg for privacy).
Once you’ve configured any approriate extra options, click the Next button.
Review
The final step of the wizard shows you the configuration settings it will generate. On the left side of the page, it will display the configuration for the host or interface from which you started the wizard (the “local” side of the connection); and on the right side of the page, it will display the configuration for the other side of the connection (the configuration for the “remote” interface).
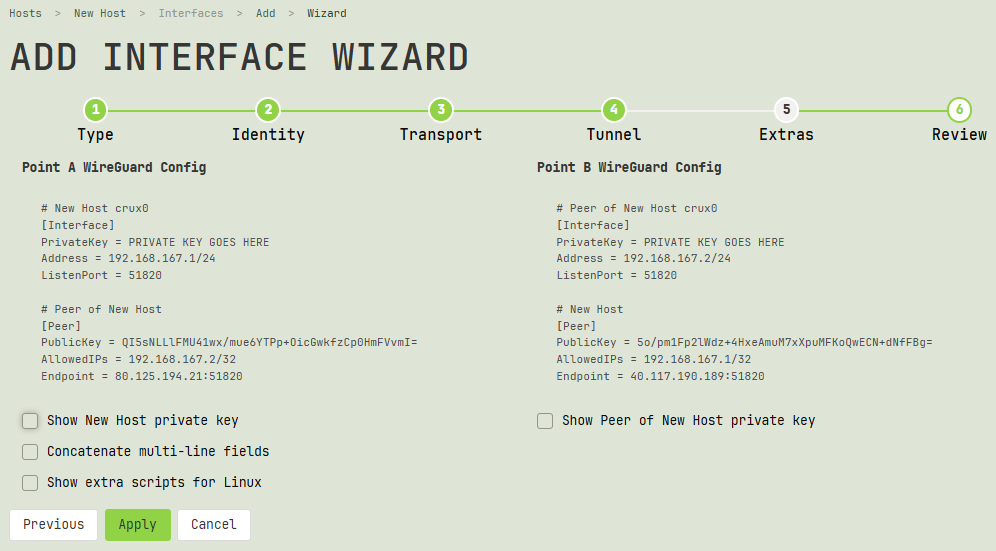
The parts of the configuration highlighted with a green background indicate the new sections of the configuration. If an interface is new, its entire configuration will be displayed with a green background; if only the endpoint is new, only the section for the new endpoint will be highlighted with a green background.
Note
If an existing interface has other existing endpoints, they will not be shown on this page; only the new endpoint will be displayed.
Use the checkboxes beneath the configuration settings to change their display (such as to show their private keys). Note that the checkboxes apply only to the display of this page — they won’t affect the underlying configuration settings themselves.
Click the Apply button to submit the form and queue the creation of the interfaces or endpoints.
Complete Set-Up
After you click the Apply button in the wizard, the next time the Crux VPN agent on each host pings the Crux VPN API server, the agent will receive the configuration for the new interface or endpoint, and apply it to the host. The Complete Set-Up page will display links to the queued changes for both sides of the connection.
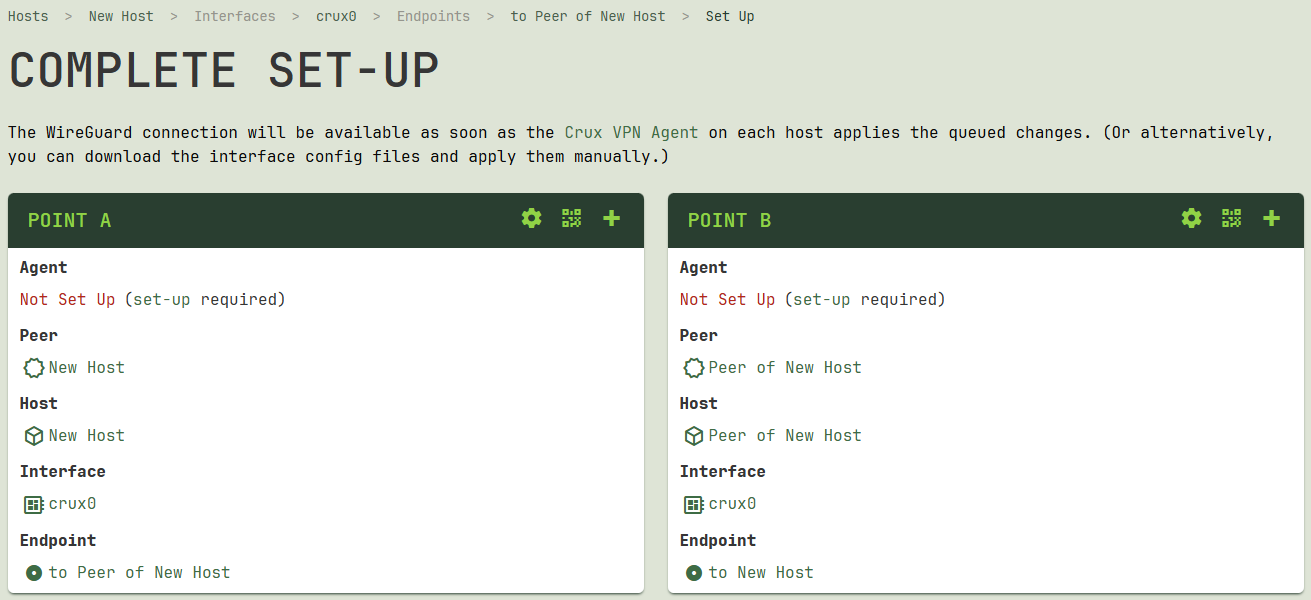
If you have not yet set up the agent on one side of the connection or the other, choose one of the following options:
- Click the
Set Up Agenticon (“gear” icon) for that side of the connection, and follow the steps to set up an agent on the host (you can also do this at any time later by following the steps from theSet Up a Hostdocumentation). - Click the
Download Interface Configicon (“QR code” icon) for that side of the connection, and download the configuration file (or QR code) for the interface (you can also do this at any time later by following the steps from theDownload Configurationdocumentation). Manually apply the downloaded configuration to the host (and then mark its queued changes as applied via the steps described in theChange Queuedocumentation).
From the Complete Set-Up page, you can also click the Add Another Endpoint icon (“plus” icon) for one side of the connection or the other to add another new connection to some other peer, starting with the interface on that side of the connection. You can also do this at any time later by following the steps from the Add an Endpoint documentation.